
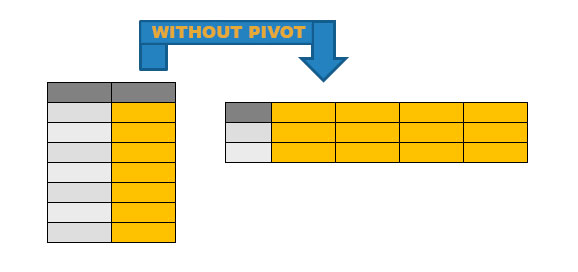
In many real-world scenarios, database professionals need to convert rows to columns in order to present data in a more organized and meaningful manner. This process, often referred to as pivoting, helps in better visualization and analysis of data, allowing users to extract valuable insights.
The PIVOT operator, introduced in Oracle 11g, simplifies the process of converting rows to columns. However, it has its limitations. For instance, it requires the target columns to be known beforehand, and it may not be suitable for dynamic column generation. In addition, the PIVOT operator is not available in earlier versions of Oracle, which means users of those versions must find alternative ways to achieve the same result.
In this article, we have explored various methods for converting rows to columns in Oracle without using the PIVOT operator. We have discussed the following techniques:
- XMLAGG (Oracle 9i)
- LISTAGG and WITHIN GROUP (Oracle 11g)
- SYS_CONNECT_BY_PATH
- CROSS JOIN
- Analytic LAG-OVER Function
- CASE Statement
- Modeling Clause
Understanding different techniques for data manipulation is essential for working with databases, as each method has its own strengths and limitations. Familiarity with multiple approaches enables you to choose the most suitable technique for your specific needs and optimize the performance of your queries.
XMLAGG (Oracle 9i)
XMLAGG is an aggregation function available in Oracle 9i and later versions that allows you to aggregate XML fragments into a single XML document. The syntax for the XMLAGG function is as follows:
XMLAGG(XMLELEMENT(e, expression) [ORDER BY column_name])
- XMLELEMENT: A function that creates an XML element with a specified name and value.
- e: The name of the XML element.
- expression: The column or expression whose values you want to aggregate.
- column_name (optional): The column by which the aggregation order is determined.
By using XMLAGG in combination with other functions such as XMLELEMENT and EXTRACT, you can achieve row-to-column conversion without using the PIVOT operator.
Example
Suppose you have a table called ’employees’ with the following structure:
| id | department_id | employee_name |
|---|---|---|
| 1 | 10 | John |
| 2 | 10 | Jane |
| 3 | 20 | Michael |
| 4 | 20 | Sarah |
| 5 | 30 | Tom |
To convert rows to columns and display employee names separated by commas for each department_id, you can use the XMLAGG function as follows:
SELECT
department_id,
RTRIM(XMLAGG(XMLELEMENT(e, employee_name || ‘,’)).EXTRACT(‘//text()’), ‘,’) AS employee_names
FROM
employees
GROUP BY
department_id;
The result would be:
| department_id | employee_names |
|---|---|
| 10 | John, Jane |
| 20 | Michael, Sarah |
| 30 | Tom |
This example demonstrates how the XMLAGG function can be effectively used to convert rows to columns in Oracle 9i. It is particularly useful when you need to concatenate string values from multiple rows into a single column, separated by a specified delimiter.
LISTAGG and WITHIN GROUP (Oracle 11g)
LISTAGG is an aggregation function introduced in Oracle 11g that allows you to concatenate multiple rows of data into a single string, using a specified delimiter. The syntax for the LISTAGG function is as follows:
LISTAGG(expression, delimiter) WITHIN GROUP (ORDER BY column_name)
- expression: The column or expression whose values you want to concatenate.
- delimiter: The separator to be used between the concatenated values.
- column_name: The column by which the concatenation order is determined.
The WITHIN GROUP clause is used in conjunction with LISTAGG to specify the order in which the rows are concatenated.
Example
Suppose you have a table called “employees” with the following data:
| emp_id | dept_id | emp_name |
|---|---|---|
| 1 | 10 | John |
| 2 | 10 | Jane |
| 3 | 20 | Michael |
| 4 | 20 | Alice |
| 5 | 30 | Bob |
If you want to display the employee names within each department as a single string, ordered by their names, you can use the LISTAGG function with the WITHIN GROUP clause:
SELECT dept_id,
LISTAGG(emp_name, ‘,’) WITHIN GROUP (ORDER BY emp_name) AS emp_names
FROM employees
GROUP BY dept_id;
The result would look like this:
| dept_id | emp_names |
|---|---|
| 10 | John, Jane |
| 20 | Alice, Michael |
| 30 | Bob |
In this example, the LISTAGG function is used to concatenate the emp_name values within each department, separated by a comma. The WITHIN GROUP clause is used to order the emp_name values alphabetically before concatenating them.
SYS_CONNECT_BY_PATH
SYS_CONNECT_BY_PATH is a hierarchical function in Oracle that returns the path of a column value from root to node, with the column values separated by a specified delimiter. It is used in conjunction with the CONNECT BY clause in hierarchical queries. The syntax for SYS_CONNECT_BY_PATH is as follows:
SYS_CONNECT_BY_PATH(column_name, delimiter)
- column_name: The name of the column whose values you want to concatenate.
- delimiter: The delimiter separates the column values in the resulting path.
Example
Suppose we have the following EMPLOYEES table:
| ID | NAME | DEPARTMENT_ID |
|---|---|---|
| 1 | Alice | 10 |
| 2 | Bob | 10 |
| 3 | Carol | 20 |
| 4 | David | 20 |
| 5 | Eve | 30 |
We want to convert the rows to columns, showing the employee names separated by commas for each department. Here’s how to use SYS_CONNECT_BY_PATH:
SELECT
DEPARTMENT_ID,
SUBSTR(SYS_CONNECT_BY_PATH(NAME, ‘,’), 2) AS EMPLOYEE_NAMES
FROM
(
SELECT
NAME,
DEPARTMENT_ID,
ROW_NUMBER() OVER (PARTITION BY DEPARTMENT_ID ORDER BY NAME) AS SEQ,
COUNT(*) OVER (PARTITION BY DEPARTMENT_ID) AS CNT
FROM
EMPLOYEES
)
WHERE
SEQ = CNT
START WITH
SEQ = 1
CONNECT BY
PRIOR SEQ + 1 = SEQ
AND PRIOR DEPARTMENT_ID = DEPARTMENT_ID;
The output would look like this:
| DEPARTMENT_ID | EMPLOYEE_NAMES |
|---|---|
| 10 | Alice, Bob |
| 20 | Carol, David |
| 30 | Eve |
In this example, SYS_CONNECT_BY_PATH is used to concatenate employee names for each department, separated by commas.
CROSS JOIN
A CROSS JOIN, also known as a Cartesian join, is a technique in SQL that combines each row of one table with each row of another table, resulting in a Cartesian product of the two tables. The syntax for CROSS JOIN is:
SELECT *
FROM table1
CROSS JOIN table2;
It is used when you want to create a combination of every row from two or more tables, without any condition. The CROSS JOIN can be used to pivot rows to columns in certain scenarios, by creating a derived table with the desired columns and then joining it to the original table.
Example
Suppose we have the following table, ITEMS:
| ITEM_ID | ITEM1 | ITEM2 | ITEM3 |
|---|---|---|---|
| 1 | A | B | C |
We want to convert the rows to columns, showing each item value in a separate row. Here’s how to use CROSS JOIN:
SELECT
ITEM_ID,
PIVOTER.ITEM_LABEL,
CASE
WHEN PIVOTER.ITEM_LABEL = ‘ITEM1’ THEN ITEM1
WHEN PIVOTER.ITEM_LABEL = ‘ITEM2’ THEN ITEM2
WHEN PIVOTER.ITEM_LABEL = ‘ITEM3’ THEN ITEM3
END AS ITEM_VALUE
FROM
ITEMS
CROSS JOIN
(
SELECT ‘ITEM1’ AS ITEM_LABEL FROM DUAL
UNION ALL
SELECT ‘ITEM2’ AS ITEM_LABEL FROM DUAL
UNION ALL
SELECT ‘ITEM3’ AS ITEM_LABEL FROM DUAL
) PIVOTER;
The output would look like this:
| ITEM_ID | ITEM_LABEL | ITEM_VALUE |
|---|---|---|
| 1 | ITEM1 | A |
| 1 | ITEM2 | B |
| 1 | ITEM3 | C |
In this example, the CROSS JOIN is used to create a derived table with the desired column labels (ITEM1, ITEM2, and ITEM3) and then join it to the original ITEMS table. The CASE statement is used to display the corresponding item values in a single column.
Analytic LAG-OVER Function
LAG is an analytic function in Oracle that allows you to access data from a previous row in the result set, relative to the current row. The LAG function can be used with the OVER() clause to specify the order and partition of the data. The syntax for the LAG function is:
LAG (expression, offset, default_value) OVER (
PARTITION BY partition_expression
ORDER BY order_expression
)
expression is the value to be fetched from the previous row, offset is the number of rows back from the current row, and default_value is the value returned when the offset goes beyond the available rows. The PARTITION BY and ORDER BY clauses inside the OVER() function are optional.
Example
Consider the following sales table with columns product_id, sales_date, and quantity:
| product_id | sales_date | quantity |
|---|---|---|
| 1 | 2022-01-01 | 10 |
| 1 | 2022-01-15 | 12 |
| 1 | 2022-02-05 | 8 |
| 2 | 2022-01-10 | 15 |
| 2 | 2022-02-03 | 20 |
| 3 | 2022-01-18 | 5 |
If you want to display the current sale along with the previous sale date and quantity for each product, you can use the LAG function as follows:
SELECT
product_id,
sales_date,
quantity,
LAG(sales_date, 1) OVER (PARTITION BY product_id ORDER BY sales_date) AS prev_sales_date,
LAG(quantity, 1) OVER (PARTITION BY product_id ORDER BY sales_date) AS prev_quantity
FROM
sales;
The result of this query would be:
| product_id | sales_date | quantity | prev_sales_date | prev_quantity |
|---|---|---|---|---|
| 1 | 2022-01-01 | 10 | (null) | (null) |
| 1 | 2022-01-15 | 12 | 2022-01-01 | 10 |
| 1 | 2022-02-05 | 8 | 2022-01-15 | 12 |
| 2 | 2022-01-10 | 15 | (null) | (null) |
| 2 | 2022-02-03 | 20 | 2022-01-10 | 15 |
| 3 | 2022-01-18 | 5 | (null) | (null) |
In this example, the LAG function is used to access the sales_date and quantity values from the previous row for each product, as specified by the PARTITION BY and ORDER BY clauses.
CASE Statement
The CASE statement is a flexible and powerful SQL construct that can be used for a variety of purposes. One of its applications is to convert rows to columns, effectively pivoting the data. By using the CASE statement, you can create a crosstab-like result, where you can conditionally aggregate and display data based on specific conditions.
The syntax for the CASE statement is:
CASE
WHEN condition1 THEN result1
WHEN condition2 THEN result2
…
ELSE resultN
END
Example
Consider the following survey_responses table with columns response_id, question_id, and answer:
| response_id | question_id | answer |
|---|---|---|
| 1 | 1 | A |
| 1 | 2 | B |
| 1 | 3 | C |
| 2 | 1 | B |
| 2 | 2 | C |
| 2 | 3 | A |
If you want to display each response’s answers as columns for each question, you can use the CASE statement as follows:
SELECT
response_id,
MAX(CASE WHEN question_id = 1 THEN answer ELSE NULL END) AS question_1,
MAX(CASE WHEN question_id = 2 THEN answer ELSE NULL END) AS question_2,
MAX(CASE WHEN question_id = 3 THEN answer ELSE NULL END) AS question_3
FROM
survey_responses
GROUP BY
response_id;
The result of this query would be:
| response_id | question_1 | question_2 | question_3 |
|---|---|---|---|
| 1 | A | B | C |
| 2 | B | C | A |
In this example, the CASE statement is used to pivot the data by aggregating the answers for each question and displaying them as separate columns.
Modeling Clause
The MODEL clause is an advanced SQL feature available in Oracle, which allows you to perform complex data manipulation and transformation tasks using a multidimensional array-like structure. By defining dimensions, measures, and rules, you can apply complex calculations, data transformations, and even pivoting operations. It is a powerful and flexible method for converting rows to columns.
The basic syntax for the MODEL clause is:
SELECT …
FROM …
WHERE …
MODEL
[DIMENSION BY (dimension_columns)]
[MEASURES (measure_columns)]
[RULES (rule_definitions)];
Example
Consider the following sales table with columns product_id, year, and sales_amount:
| product_id | year | sales_amount |
|---|---|---|
| 1 | 2020 | 1000 |
| 1 | 2021 | 1100 |
| 2 | 2020 | 900 |
| 2 | 2021 | 950 |
If you want to display the sales amount for each product as columns, you can use the MODEL clause as follows:
SELECT
year,
product_1_sales,
product_2_sales
FROM
(SELECT
year,
product_id,
sales_amount
FROM
sales)
MODEL
DIMENSION BY (year)
MEASURES (sales_amount,
0 AS product_1_sales,
0 AS product_2_sales)
RULES (product_1_sales[ANY] = CASE WHEN product_id = 1 THEN sales_amount[CV()] ELSE NULL END,
product_2_sales[ANY] = CASE WHEN product_id = 2 THEN sales_amount[CV()] ELSE NULL END)
ORDER BY
year;
The result of this query would be:
| year | product_1_sales | product_2_sales |
|---|---|---|
| 2020 | 1000 | 900 |
| 2021 | 1100 | 950 |
In this example, the MODEL clause is used to pivot the data by defining dimensions (year) and measures (sales_amount, product_1_sales, product_2_sales). The RULES section then defines the calculations and conditions for the new columns, effectively converting rows to columns.
Conclusion
We encourage you to explore other SQL features and techniques that Oracle offers, as they can help you solve a wide range of data manipulation and transformation tasks. Continuously learning and expanding your SQL knowledge will improve your overall proficiency in working with databases.
It is important to note that it is best to try to use the PIVOT operator whenever possible, as it is designed specifically for this purpose and can simplify your queries. To learn more about the PIVOT operator and how to use it in Oracle, you can read the Oracle PIVOT – Rows to Columns article.